DIY Christmas Gifts
Budget-Friendly Holiday Gift Guide
(function(d){
var f = d.getElementsByTagName(‘SCRIPT’)[0], p = d.createElement(‘SCRIPT’);
p.type = ‘text/javascript’;
p.async = true;
p.src = ‘//assets.pinterest.com/js/pinit.js’;
p.setAttribute(‘data-pin-hover’, true);
f.parentNode.insertBefore(p, f);
}(document));
function openWin() {
myWindow = window.open(“http://www.youtube.com/channel/UCHGLUxlObWaCOcDTYiuZFPA?sub_confirmation=1”, “0, 0”, “width=575, height=325”); // Opens a new window
AnalyticsTrackEvent(‘Social’, ‘Subscribe’, ‘YouTube’);
}
The holiday season is a special time of year. It’s an exciting time when we spend extra time with family and
friends and celebrate with dinner parties and special gatherings. We attend office parties with coworkers and
White Elephant parties with neighbors. On top of that, there are stockings to stuff and tree skirts to cover.
The pressures of gift giving can get overwhelming. Every item adds up, and before we know it, we are over budget.
A great way to help relieve your wallet is to roll up your sleeves, grab a pair of scissors, get
creative, and make some gifts yourself. The DIY industry has taken over the Internet, so it is fairly
easy these days to get inspired and make a meaningful, thoughtful gift yourself. Here are a few ideas
to help get you started.
DIY Gift Kits
This gift idea requires the least amount of craft skills. You simply need to know the recipient’s likes and dislikes.
Is your best friend a movie buff? Fill a small popcorn tub with a movie ticket, a pack of microwave popcorn, and a candy bar.
Does your mother need some “me time”? Fill a jar with sample-sized bubble bath, soaps, and lotions. You can also throw in her
favorite nail polish color, a nail file, and a pair of nail clippers. Does your neighbor have a sweet tooth? Make little hot
chocolate kits in baggies with layered cocoa powder, chocolate chips, and peppermint crumbles.
DIY Beauty Products
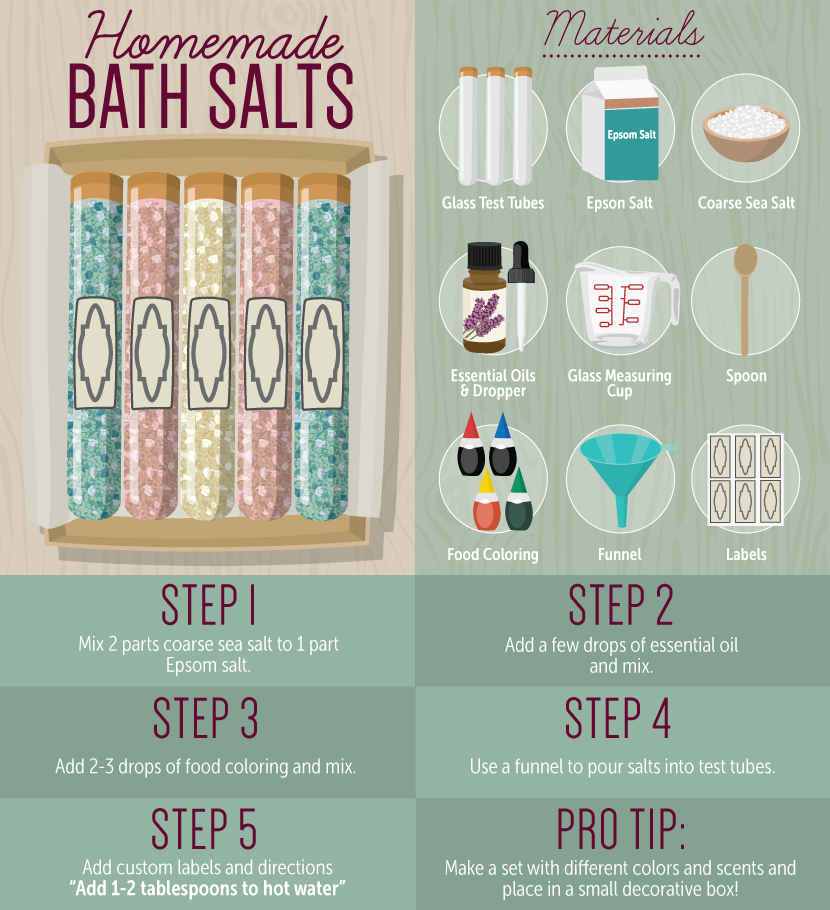
DIY beauty products such as lip balm, bath scrubs, and bath salts are both fun to make and economical. You can
make several batches for a low cost. You can also choose from different levels of DIY difficulty. For the beginner,
consider making brown sugar and coconut foot scrub by combining equal parts of coconut oil and brown sugar. For the
intermediate crafter, you can make colorful bath salts.
To make homemade bath salts, you need Epsom salt, coarse sea salt, essential oils, and food coloring.
The recipe is two parts coarse sea salt to one part Epsom salt. The amount will vary depending on the size
of your container. Mix the two ingredients thoroughly. Add a few drops of an essential oil of your choice
and mix. For color, add two to three drops of food coloring at a time and mix. Add coloring until you reach
the desired color. Make a tag for your gift with instructions to add 1–2 tablespoons to hot water.
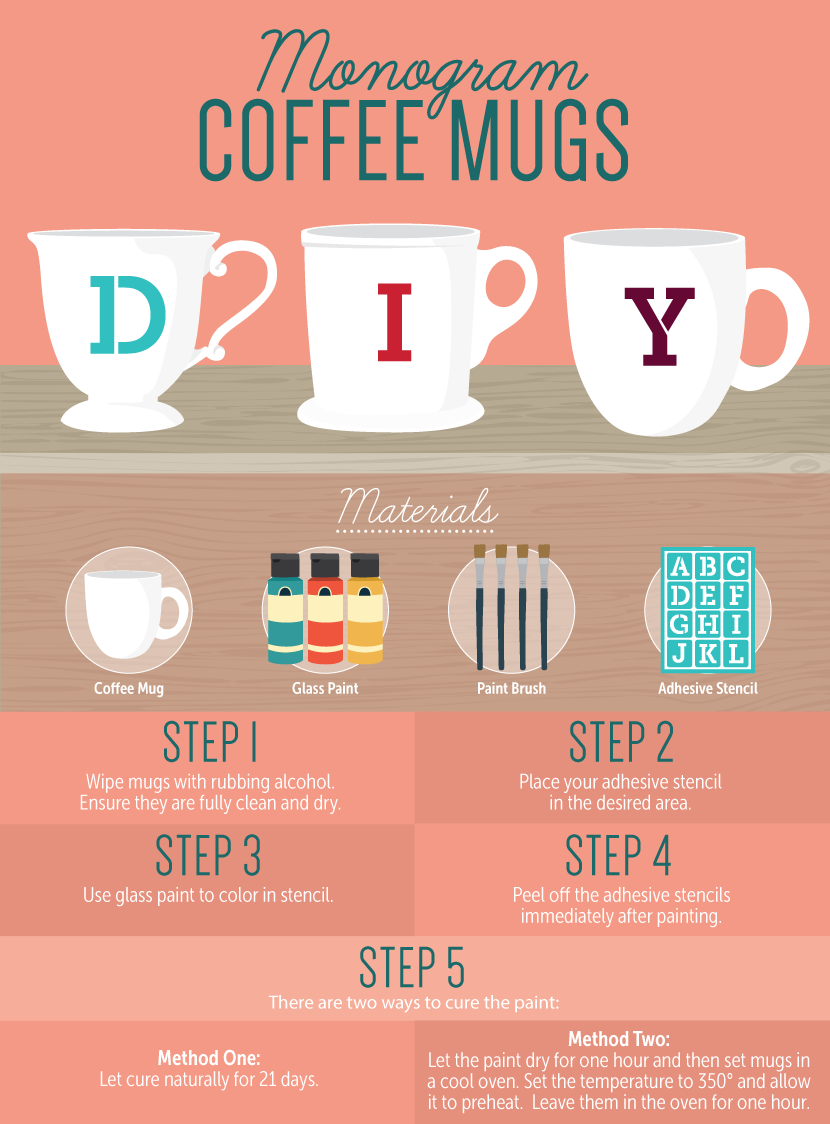
DIY Personalized or Monogrammed Gifts
Stenciling script or a monogram on a mug, pillow, T-shirt, or canvas tote bag makes a great personalized gift.
You can stencil a first or last name, initials, a favorite word, or an inside joke. To save even more money, check
thrift stores, which often carry a variety of plain mugs and T-shirts for one to two dollars apiece.
To make personalized mugs, you need glass paint, a paint brush, and adhesive stencils. Before you begin, make sure your mugs are oven safe.
First, clean and dry your mugs. Wipe down the areas you will be stenciling with rubbing alcohol. Place the stencil in the desired area, and
paint inside the stencil. Peel off the stencil. To cure the paint, let it dry for one hour and then place the mugs inside a cool oven. Set
the temperature to 350 degrees and allow it to preheat. Turn off the heat and leave the mugs inside the oven for one hour. Depending on the
paint you choose, the mugs can be hand washed or washed on the top rack of a dishwasher. Read the paint label for the best results.
DIY Photo Gifts
You can’t get more personal than gifting a treasured photo. Photos, which are probably my favorite type of homemade gift, can be uniquely framed or turned
into bookmarks, cards, and coasters. A photo collage monogram is a great gift for parents, grandparents, and best friends. You can purchase papier mâché or
wood letters from retailers for as little as three dollars a piece. You can choose to make a whole word, a name, or just one initial.
To make a photo collage letter, you need photos, scissors, Mod Podge, a paint brush, a craft knife, and a cutting mat. Gather and print
several black and white pictures and cut them down to a smaller size to fit your letter. If you have trouble finding photos, you can print
them off your social media networks. Paint Mod Podge directly onto the letter and behind the photo. It is okay to overlap photos and go
over the lines of the letter. Once the letter is covered, brush a layer of Mod Podge over the entire collage. Allow it to dry. Once the
monogram is dry, place it upside down on a cutting mat. Trim the excess photo edges with a craft knife.
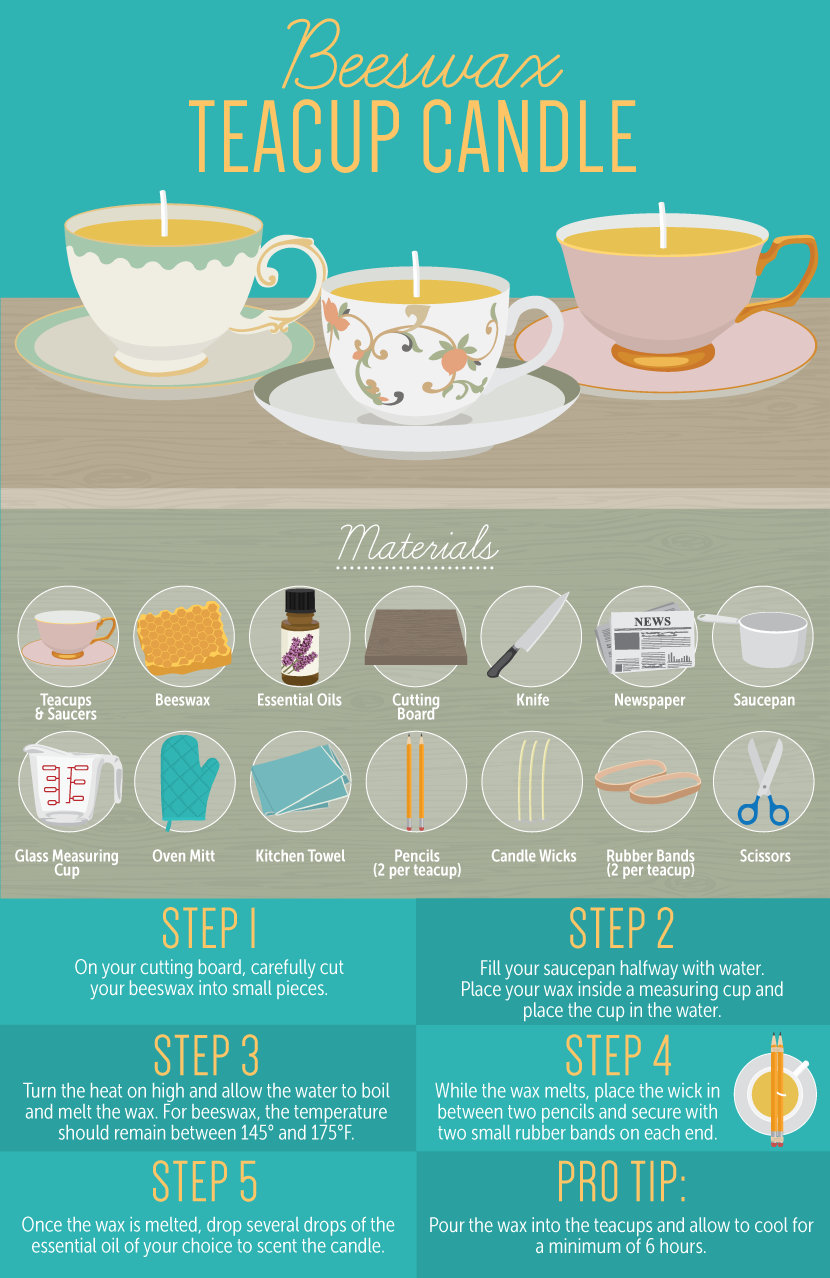
DIY Candles
Nothing reminds me of the holidays more than the aromas of spiced candles. Making your own is more cost efficient than purchasing
them, and you can get creative with the type of container you use. You can make your own candles in Mason jars, ramekins, recycled
glass or metal containers, mugs, and tea cups.
To make your own candles, you will need beeswax; essential oils; a cutting board; a knife; a saucepan; a Pyrex measuring cup;
chopsticks, pencils, or pens; rubber bands; candle wicks; and scissors. On your cutting board, carefully cut your beeswax block
into small, thin pieces. The amount of wax you need will depend on the size of your container. Fill your saucepan halfway with
water. Place your wax inside a Pyrex measuring cup, and place the cup inside the water. Turn the heat to high, and allow the
water to boil and the wax to melt. If you like, you can use a thermometer to keep track of the temperature. For beeswax, the
temperature should remain between 145 and 175 degrees Fahrenheit.
While you are waiting for your wax to melt, prepare your wick. Place the wick between two chopsticks and secure it
with two small rubber bands on each end. Make sure the wick is centered. Once the wax is melted, add several drops of
the essential oil of your choice to scent the candle. Use an oven mitt to grab the handle and carefully pour the wax
into the container. Allow the wax to cool for at least 6 hours. Trim the candle wick and remove the chopsticks.
Homemade gifts are thoughtful, personal, and budget friendly. With a little time and creativity, you can make a beautiful,
handmade gift that comes from the heart. This season, don’t stress. Instead, grab a cup of coffee and get your creative juices flowing.
(function(d){
var f = d.getElementsByTagName(‘SCRIPT’)[0], p = d.createElement(‘SCRIPT’);
p.type = ‘text/javascript’;
p.async = true;
p.src = ‘//assets.pinterest.com/js/pinit.js’;
p.setAttribute(‘data-pin-hover’, true);
f.parentNode.insertBefore(p, f);
}(document));
function openWin() {
myWindow = window.open(“http://www.youtube.com/channel/UCHGLUxlObWaCOcDTYiuZFPA?sub_confirmation=1”, “0, 0”, “width=575, height=325”); // Opens a new window
AnalyticsTrackEvent(‘Social’, ‘Subscribe’, ‘YouTube’);
}