/*! elementor – v3.18.0 – 20-12-2023 */
.elementor-widget-text-editor.elementor-drop-cap-view-stacked .elementor-drop-cap{background-color:#69727d;color:#fff}.elementor-widget-text-editor.elementor-drop-cap-view-framed .elementor-drop-cap{color:#69727d;border:3px solid;background-color:transparent}.elementor-widget-text-editor:not(.elementor-drop-cap-view-default) .elementor-drop-cap{margin-top:8px}.elementor-widget-text-editor:not(.elementor-drop-cap-view-default) .elementor-drop-cap-letter{width:1em;height:1em}.elementor-widget-text-editor .elementor-drop-cap{float:left;text-align:center;line-height:1;font-size:50px}.elementor-widget-text-editor .elementor-drop-cap-letter{display:inline-block} Mounting a slide for the best performance
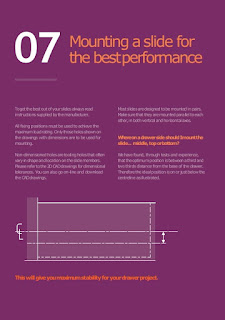
To get the best out of your slides always read instructions supplied by the manufacturer.
Most slides are designed to be mounted in pairs. Make sure that they are mounted parallel to each other, in both vertical and horizontal axes.
All fixing positions must be used to achieve the maximum load rating. Only those holes shown on the drawings with dimensions are to be used for mounting.
Where on a drawer side should I mount the slide... middle, top or bottom?
Non-dimensioned holes are tooling holes that often vary in shape and location on the slide members.
Please refer to the 2D CAD drawings for dimensional tolerances. You can also go online and download the CAD drawings.
We have found, through tests and experience, that the optimum position is between a third and two-thirds distance from the base of the drawer. Therefore the ideal position is on or just below the centreline as illustrated.
#slides #drawerslides #telescopicslides #ballbearingdrawerslides#heavydutydrawerslides


